Recover data from quarantine
In this guide you'll learn about the quarantine Data Source, and how to use it to detect and fix errors on your Data Sources.
The quarantine Data Source is named {datasource_name}_quarantine and can be queried using Pipes like a regular Data Source.
Prerequisites
This guide assumes you're familiar with the concept of the quarantine Data Source.
Example scenario
This guide uses the Tinybird CLI, but all steps can be performed in the UI as well.
Setup
This example uses an NDJSON Data Source that looks like this:
{
  "store_id": 1,
  "purchase": { "product_name": "shoes", "datetime": "2022-01-05 12:13:14" }
}
But you could use any ingestion method.
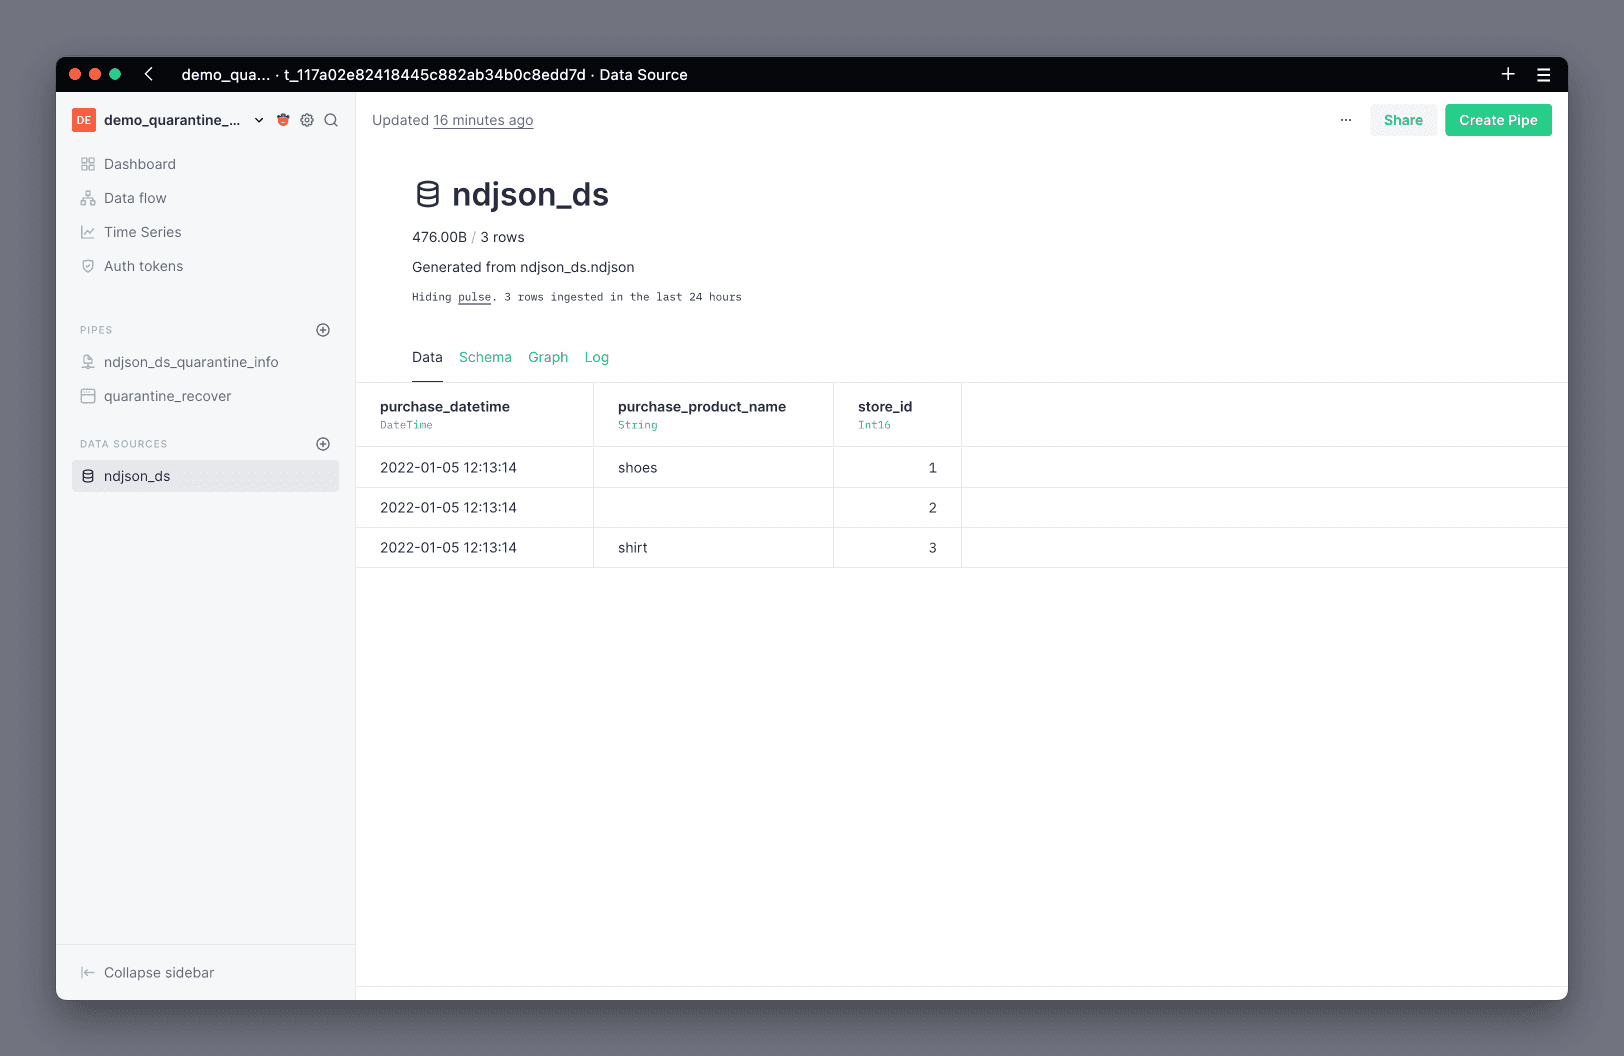
Let's say you generate a Data Source file from this JSON snippet, push the Data Source to Tinybird, and ingest the JSON as a single row:
Push the NDJSON_DS Data Source
echo '{"store_id":1,"purchase":{"product_name":"shoes","datetime":"2022-01-05 12:13:14"}}' > ndjson_ds.ndjson
tb datasource generate ndjson_ds.ndjson
tb push --fixtures datasources/ndjson_ds.datasource
tb sql "select * from ndjson_ds"
The schema generated from the JSON will look like this:
NDJSON_DS.DATASOURCE
DESCRIPTION >
    Generated from ndjson_ds.ndjson

SCHEMA >
    purchase_datetime DateTime `json:$.purchase.datetime`,
    purchase_product_name String `json:$.purchase.product_name`,
    store_id Int16 `json:$.store_id`
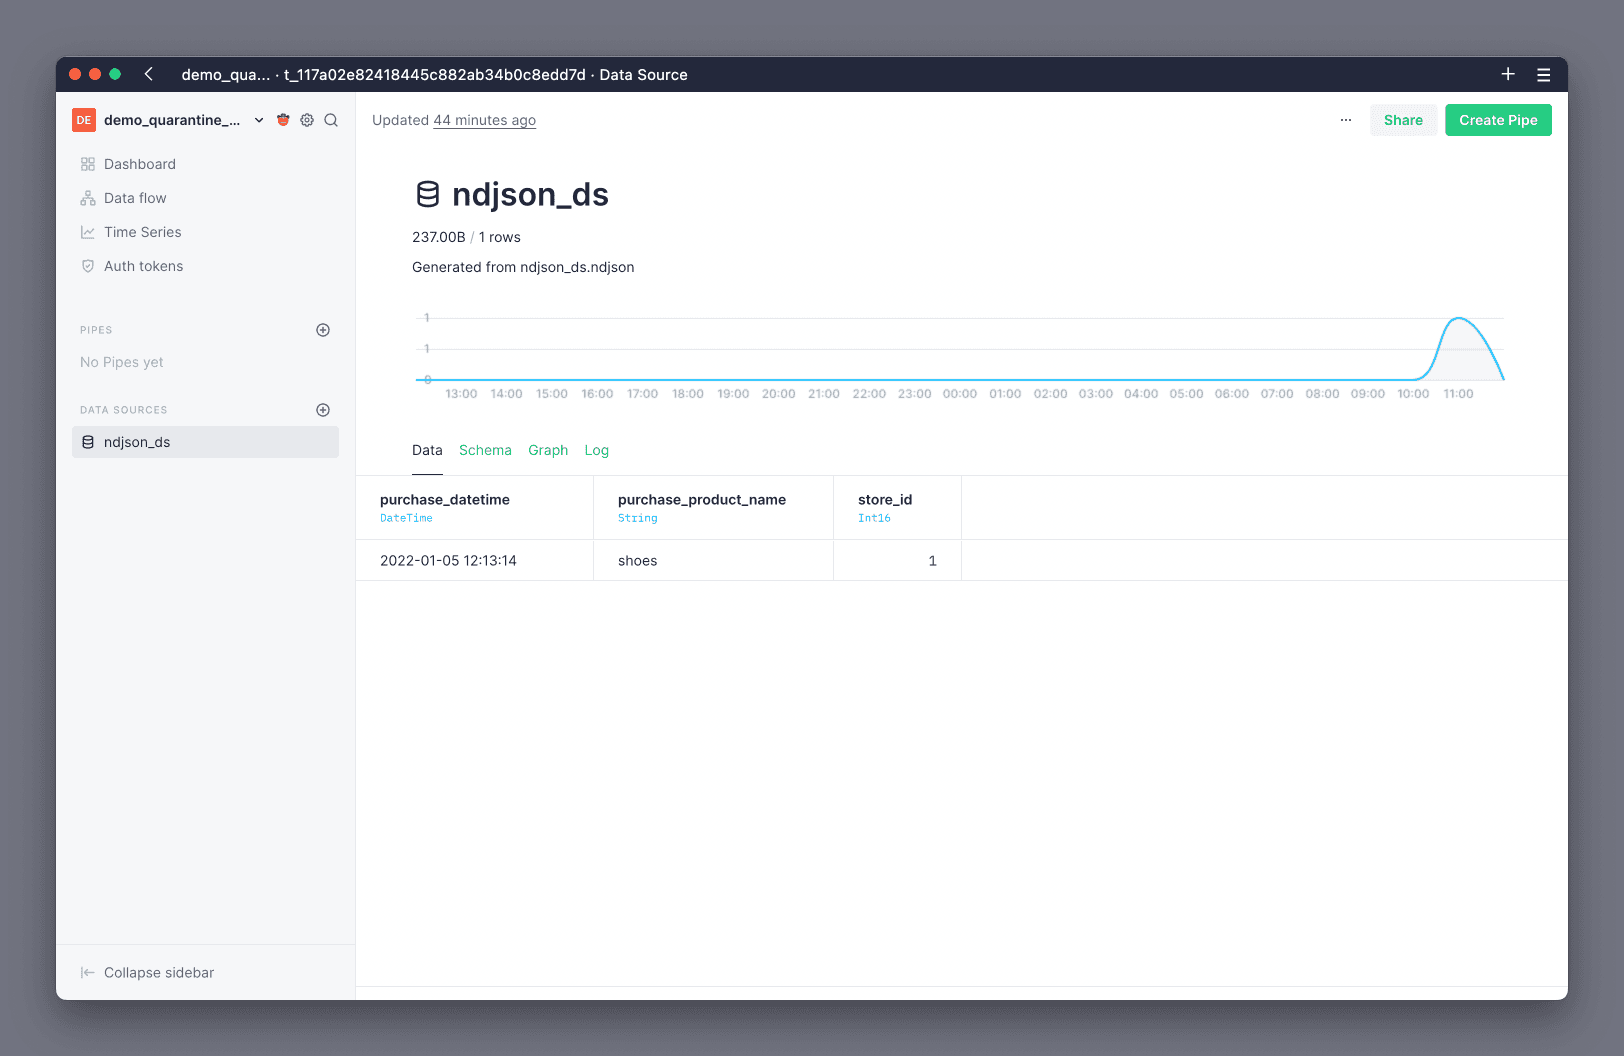
At this point, you can in the UI and confirm your Data Source had been created and the row ingested. Hooray!
Add data that doesn't match the schema
Now, if you append some rows that don't match the Data Source schema, these rows will end up in the quarantine Data Source.
Append rows with wrong schema
echo '{"store_id":2,"purchase":{"datetime":"2022-01-05 12:13:14"}}\n{"store_id":"3","purchase":{"product_name":"shirt","datetime":"2022-01-05 12:13:14"}}' > ndjson_quarantine.ndjson
tb datasource append ndjson_ds ndjson_quarantine.ndjson
tb sql "select * from ndjson_ds_quarantine"
This time, if you check in the UI, you'll see a notification warning you about quarantined rows:
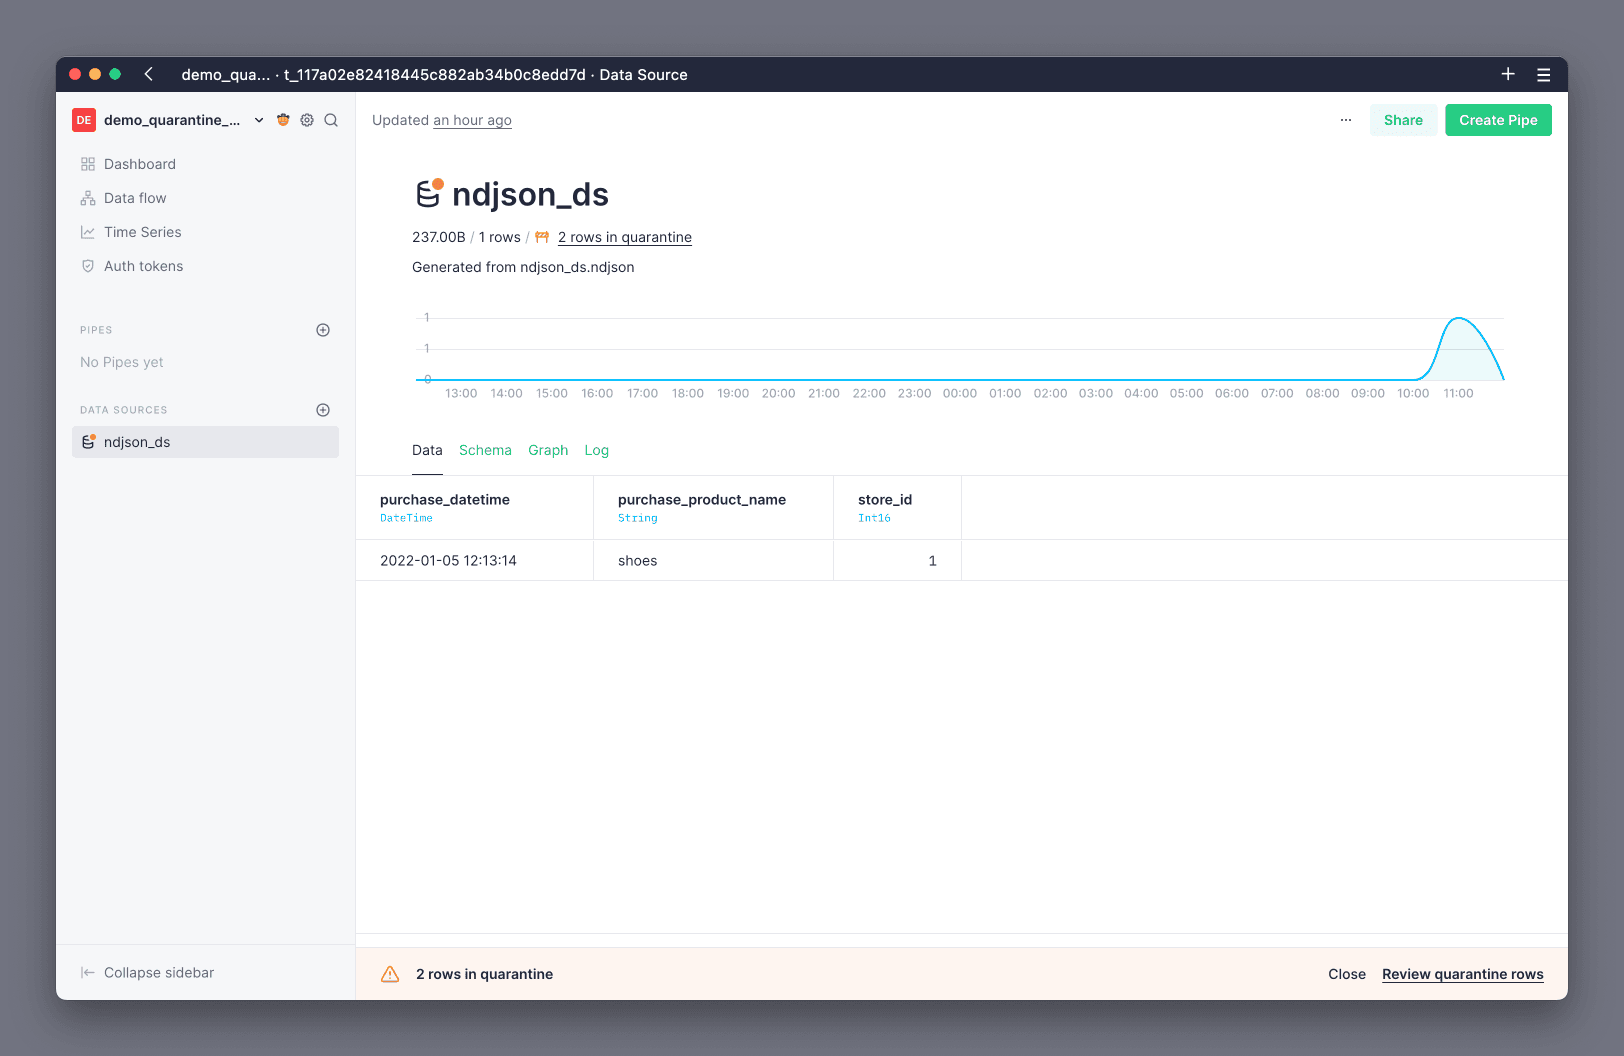
In the Data Source view you'll find the Log tab, which shows you details about all operations performed on a Data Source. If you're following the steps of this guide, you should see a row with event_type as append and written_rows_quarantine as 2.
From the quarantine warning notification, navigate to the quarantine Data Source page, and review the problematic rows:
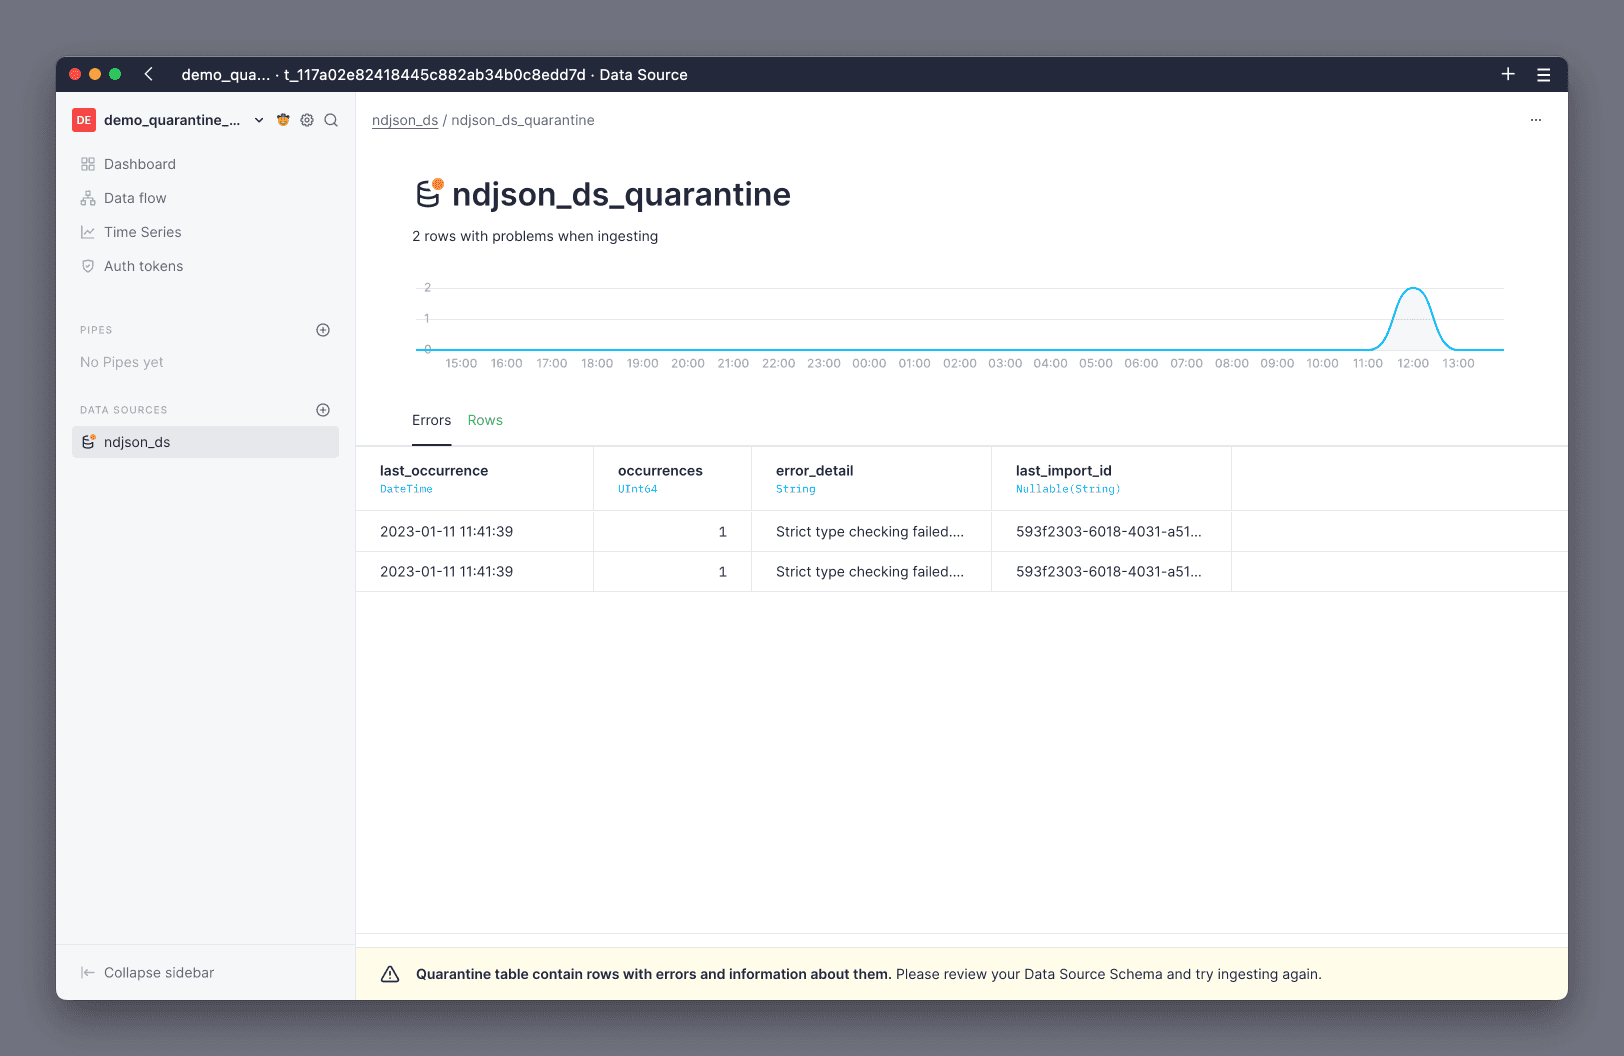
The Errors view shows you a summary of all the errors and the number of occurrences for each of those, so you can prioritize fixing the most common ones. The Rows view shows you all the rows that have failed, so you can further investigate why.
Fix quarantine errors
There are generally three ways of fixing quarantine errors:
1. Modify your data producer
Usually, the best solution is to fix the problem at the source. This means updating the applications or systems that are producing the data, before they send it to Tinybird.
The benefit of this is that you don't need to do additional processing to normalize the data after it has been ingested, which helps to save cost and reduce overall latency. However, it can come at the cost of having to push changes into a production application, which can be complex or have side effects on other systems.
2. Modify the Data Source schema
Often, the issue that causes a row to end up in quarantine is a mismatch of data types.
A simple solution is to modify the Data Source schema to accept the new type.
For example, if an application is starting to send integers that are too large for Int8, you might update the schema to use Int16.
Avoid Nullable columns, as they can have significantly worse performance. Instead, send alternative values like 0 for any Int type, or an empty string for a String type.
3. Transform data with Pipes and Materialized Views
This is one of the most powerful capabilities of Tinybird.
If you are not able to modify the data producer, you can apply a transformation to the erroring columns at ingestion time and materialize the result into another Data Source.
You can read more about this in the Materialized Views docs.
Recover rows from quarantine
The quickest way to recover rows from quarantine is to fix the cause of the errors and then re-ingest the data. However, that is not always possible.
You can recover rows from the quarantine using a recovery Pipe and the Tinybird API:
Create a recovery pipe
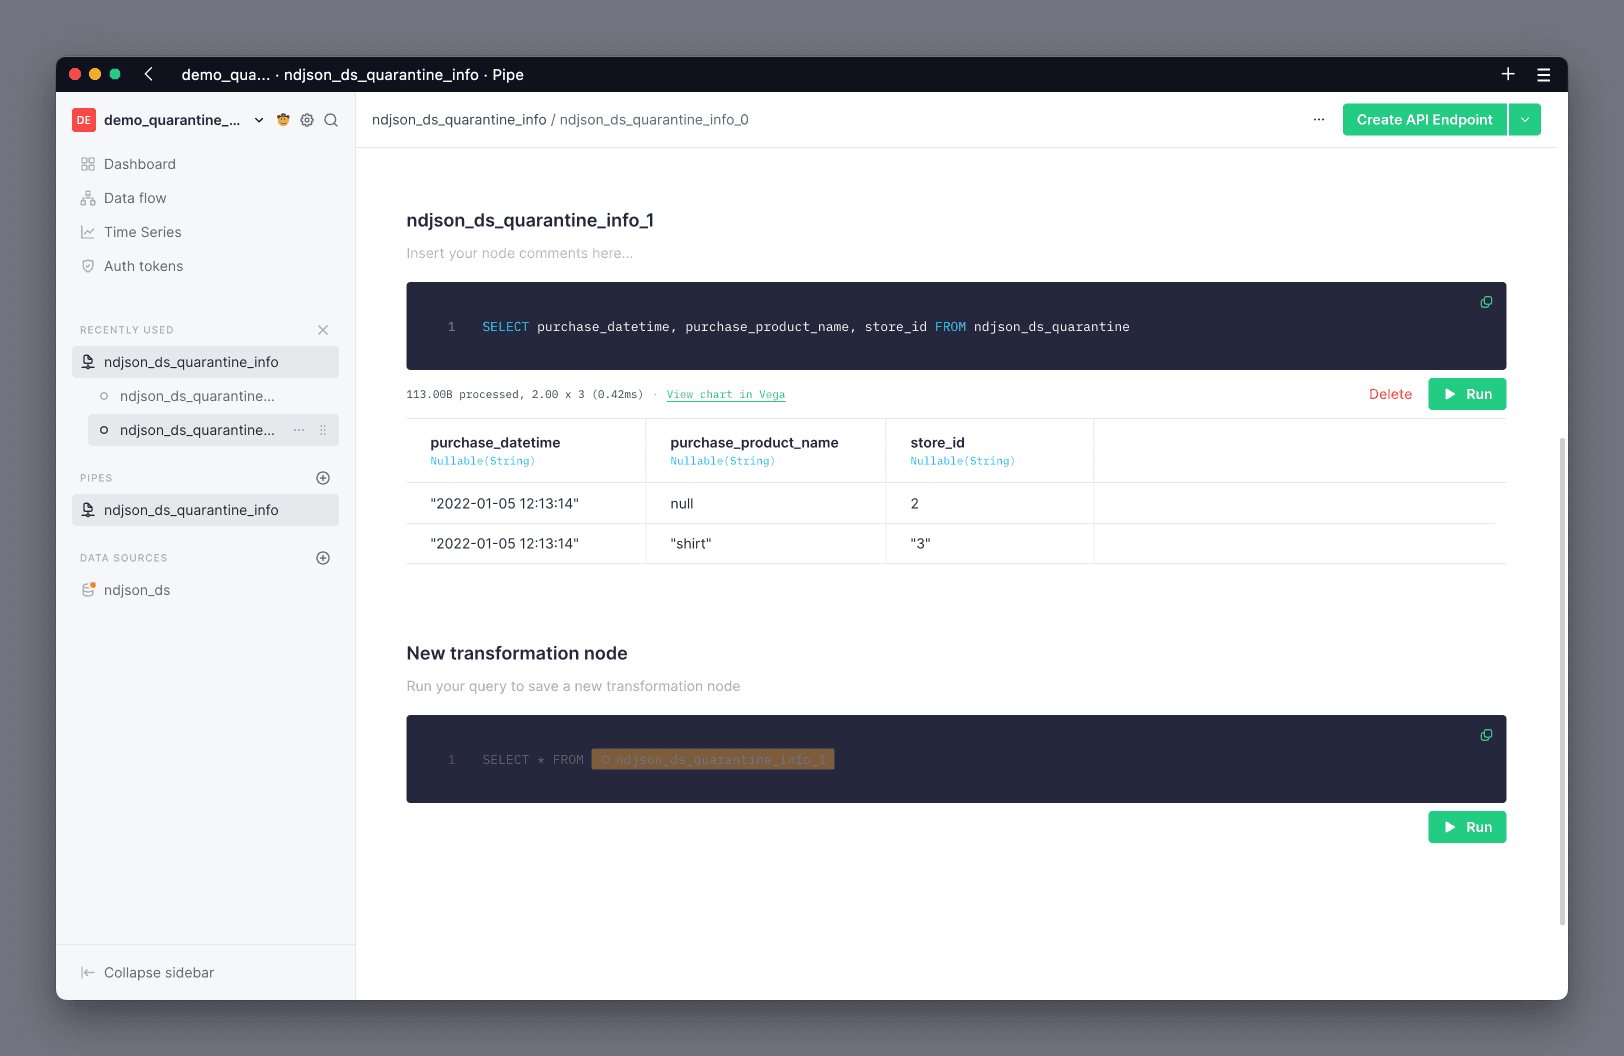
You can create a Pipe to select the rows from the quarantine Data Source and transform them into the appropriate schema.
The previous example showed rows where the purchase_product_name contained null or the store_id contained a String rather than an Int16:
All columns in a quarantine Data Source are Nullable(), which means that you must use the coalesce() function if you want to transform them into a non-nullable type. This example uses coalesce to set a default value of DateTime(0), '', or 0 for DateTime, String and Int16 types respectively.
Additionally, all columns in a quarantine Data Source are stored as String. This means that you must specifically transform any non-String column into its desired type as part of the recovery pipe. This example transforms the purchase_datetime and store_id columns to DateTime and Int16 types respectively.
Lastly, any columns sent to quarantine that were already a String will be encased in double quotes "". This means that you may need to remove double quotes around them using substring().
The quarantine Data Source contains additional meta-columns c__error_column, c__error, c__import_id, and insertion_date with information about the errors and the rows, so you should not use SELECT * to recover rows from quarantine.
The following SQL transforms the quarantined rows from this example into the original Data Source schema:
SELECT
   coalesce(
      parseDateTimeBestEffortOrNull(
            substring(purchase_datetime, 2, length(purchase_datetime) - 2)
      ),
      toDateTime(0)
   ) as purchase_datetime,
   coalesce(
      substring(purchase_product_name, 2, length(purchase_product_name) - 2),
      ''
   ) as purchase_product_name,
   coalesce(
      coalesce(
            toInt16(store_id),
            toInt16(substring(store_id, 2, length(store_id) - 2))
      ),
      0
   ) as store_id
FROM ndjson_ds_quarantine
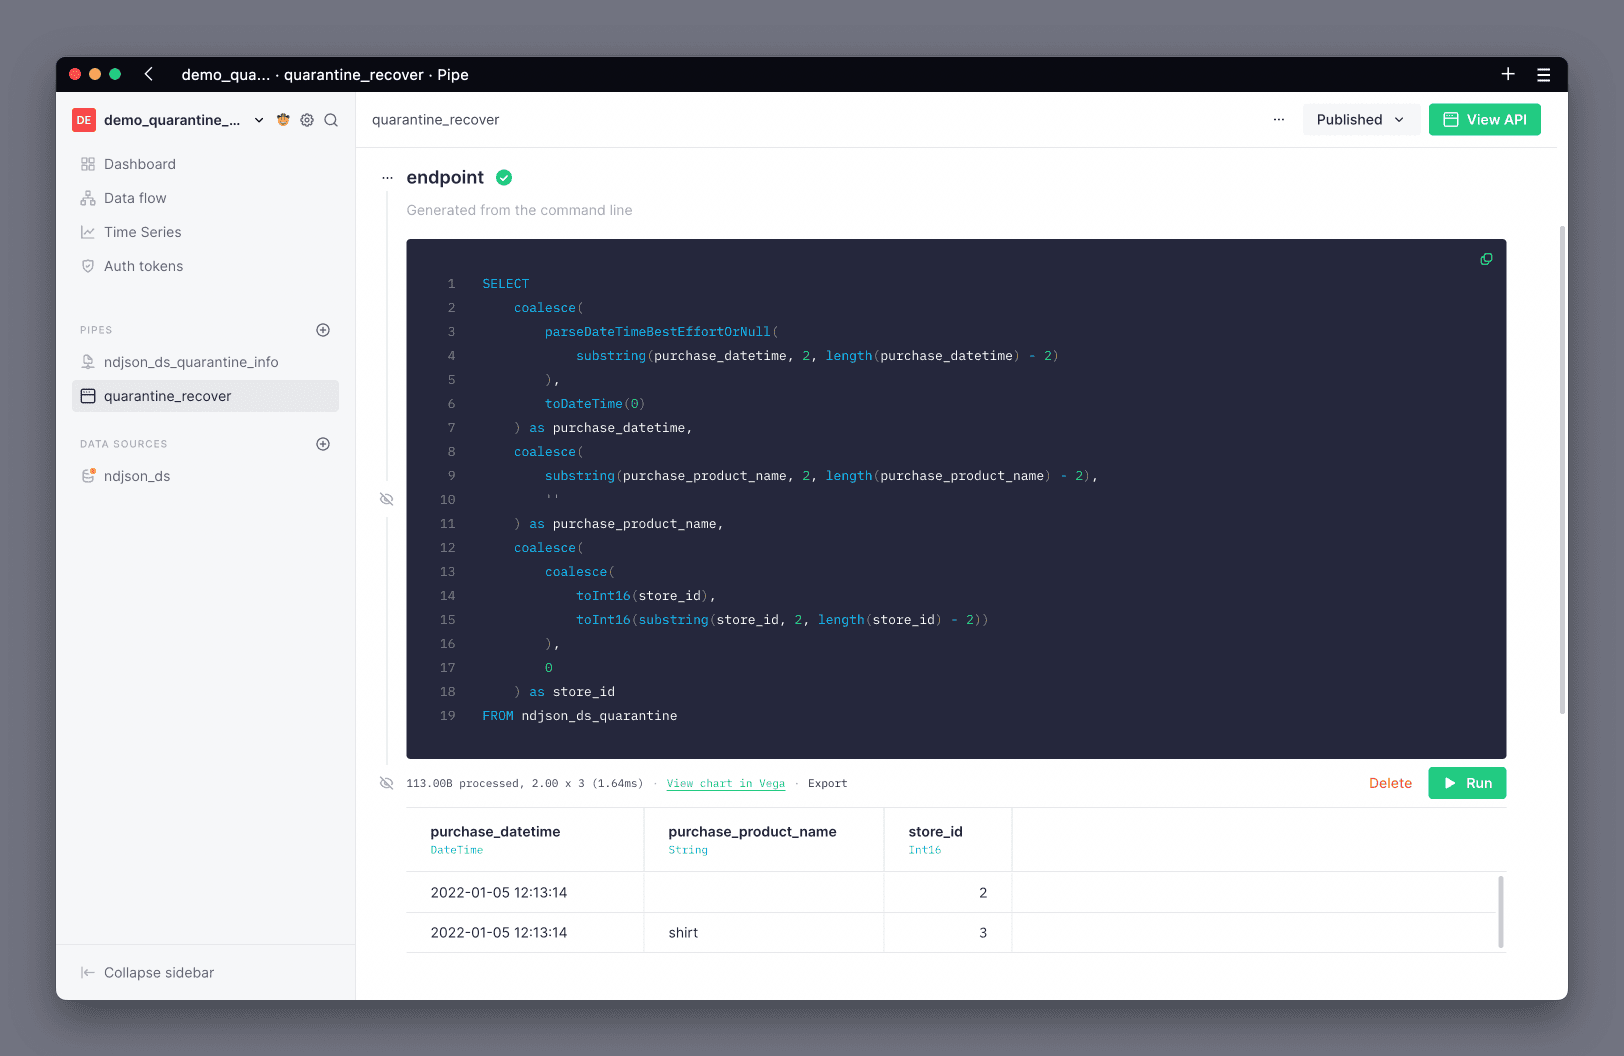
Just as with any other Pipe, you can publish the results of this recovery Pipe as an API Endpoint.
Ingest the fixed rows and truncate quarantine
You can then use the Tinybird CLI to append the fixed data back into the original Data Source, by hitting the API Endpoint published from the recovery Pipe:
tb datasource append <datasource_name> <url>
To avoid dealing with JSONPaths, you can hit the recovery Pipe's CSV endpoint:
tb datasource append ndjson_ds https://api.tinybird.co/v0/pipes/quarantine_recover.csv?token=<your_api_token>
Check that your Data Source now has the fixed rows, either in the UI, or from the CLI using:
tb sql "select * from ndjson_ds"
Finally, truncate the quarantine Data Source to clear out the recovered rows, either in the UI, or from the CLI using:
tb datasource truncate ndjson_ds_quarantine --yes
You should see that your Data Source now has all of the rows, and the quarantine notification has disappeared.
If your quarantine has too many rows, you may need to add pagination based on the insertion_date and/or c__import_id columns.
If you're using a Kafka Data Source, remember to add the Kafka metadata columns.
Recover rows from quarantine with CI/CD
When you connect your Workspace to Git and it becomes read-only you want all your workflows to go through CI/CD. This is how you recover rows from quarantine in your data project using Git and automating the workflow.
Prototype the process in a Branch
This step is optional, but it's good practice. When you need to perform a change to your data project and it's read-only, you can create a new Branch and prototype the changes there, then later bring them to Git.
To test this process:
- Create a Branch
- Ingest a file that creates rows in quarantine
- Prototype a Copy Pipe
- Run it
- Validate data is recovered
A practical example with Git
There is an additional guide showing how to recover quarantine rows from Git using CI/CD, where the data project is the Web Analytics Starter Kit.
When your rows end up in quarantine, you receive an e-mail like this:
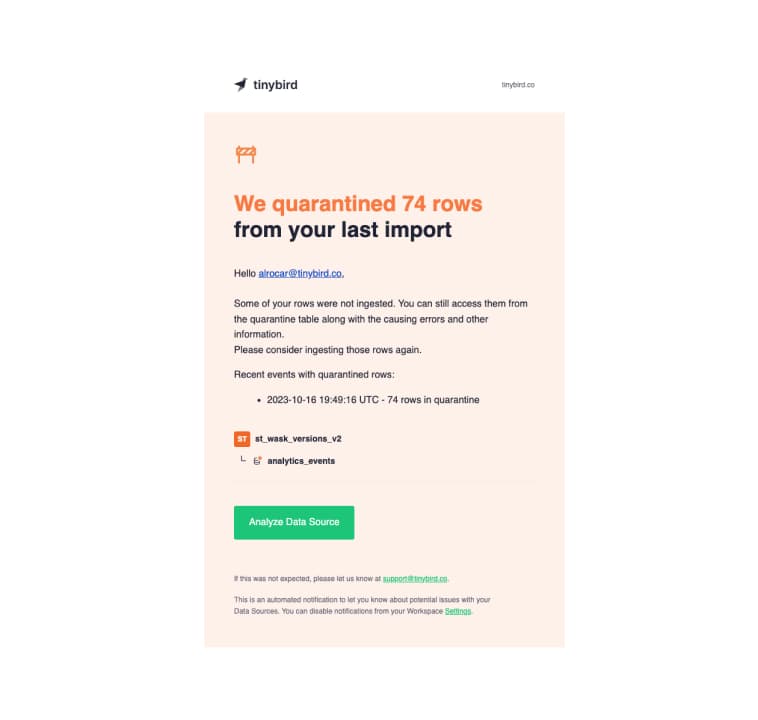
In this additional example, the issue is the timestamp column - instead of being a DateTime, it's String Unix time, so the rows can't be properly ingested.
{"timestamp":"1697393030","session_id":"b7b1965c-620a-402a-afe5-2d0eea0f9a34","action":"page_hit","version":"1","payload":"{ \"user-agent\":\"Mozilla\/5.0 (Linux; Android 13; SM-A102U) AppleWebKit\/537.36 (KHTML, like Gecko) Chrome\/106.0.5249.118 Mobile Safari\/537.36\", \"locale\":\"en-US\", \"location\":\"FR\", \"referrer\":\"https:\/\/www.github.com\", \"pathname\":\"\/pricing\", \"href\":\"https:\/\/www.tinybird.co\/pricing\"}"}
To convert the timestamp values in quarantine to a DateTime, you'd build a Copy Pipe like this:
NODE copy_quarantine
SQL >
   SELECT
      toDateTime(fromUnixTimestamp64Milli(toUInt64(replaceAll(assumeNotNull(timestamp), '"', '')) * 1000)) timestamp,
      -- fields in an ndjson are saved in the quarantine with double quotes, we need to get rid of them
      replaceAll(assumeNotNull(session_id), '"', '') session_id,
      replaceAll(assumeNotNull(action), '"', '') action,
      replaceAll(assumeNotNull(version), '"', '') version,
      replaceAll(assumeNotNull(payload), '"', '') payload
   FROM analytics_events_quarantine

TYPE COPY
TARGET_DATASOURCE analytics_events
To test the changes, you'd need to do a custom deployment:
#!/bin/bash
# use set -e to raise errors for any of the commands below and make the CI pipeline to fail
set -e

tb datasource append analytics_events datasources/fixtures/analytics_events_errors.ndjson
tb deploy
tb pipe copy run analytics_events_quarantine_to_final --wait --yes
sleep 10
First append a sample of the quarantined rows, then deploy the Copy Pipe, and finally run the copy operation.
Once changes have been deployed in a test Branch, you can write data quality tests to validate the rows are effectively being copied:
- analytics_events_quarantine:
    max_bytes_read: null
    max_time: null
    sql: |
      SELECT
            count() as c
      FROM analytics_events_quarantine
      HAVING
            c <= 0

- copy_is_executed:
    max_bytes_read: null
    max_time: null
    sql: |
      SELECT count() c, sum(rows) rows
      FROM tinybird.datasources_ops_log
      WHERE datasource_name = 'analytics_events'
      AND event_type = 'copy'
      HAVING rows != 74 and c = 1
analytics_events_quarantine checks that effectively some of the rows are in quarantine while copy_is_executed tests that the rows in quarantine have been copied to the analytics_events Data Source.
Lastly, you need to deploy the Branch:
# use set -e to raise errors for any of the commands below and make the CI pipeline to fail
set -e

tb deploy
tb pipe copy run analytics_events_quarantine_to_final --wait
You can now merge the Pull Request, the Copy Pipe will be deployed to the Workspace and the copy operation will be executed ingesting all rows in quarantine.
After that you can optionally truncate the quarantine Data Source using tb datasource truncate analytics_events_quarantine.
This is a working Pull Request with all the steps mentioned above.
Next steps
- Make sure you're familiar with the challenges of backfilling real-time data
- Learn how to monitor your ingestion.