Build charts with iframes and JWTs
In this guide, you'll learn how to build Tinybird Charts using inline frames (iframes) and secure them using JSON Web Tokens (JWTs)
Tinybird Charts make it easy to visualize your data and create interactive charts. As soon as you've published an API Endpoint, you can create a Chart from the Tinybird UI, then immediately embed it in your frontend application. Check out the live demo to see an example of Charts in action.
JWTs are signed tokens that allow you to securely authorize and share data between your application and Tinybird.
Prerequisites
This guide assumes that you have a Tinybird Workspace with active data and one or more published API Endpoints.
You'll need a basic familiarity with JavaScript and Python.
1. Create a Chart
Create a new Chart based on any of your API Endpoints.
2. View the Chart component code
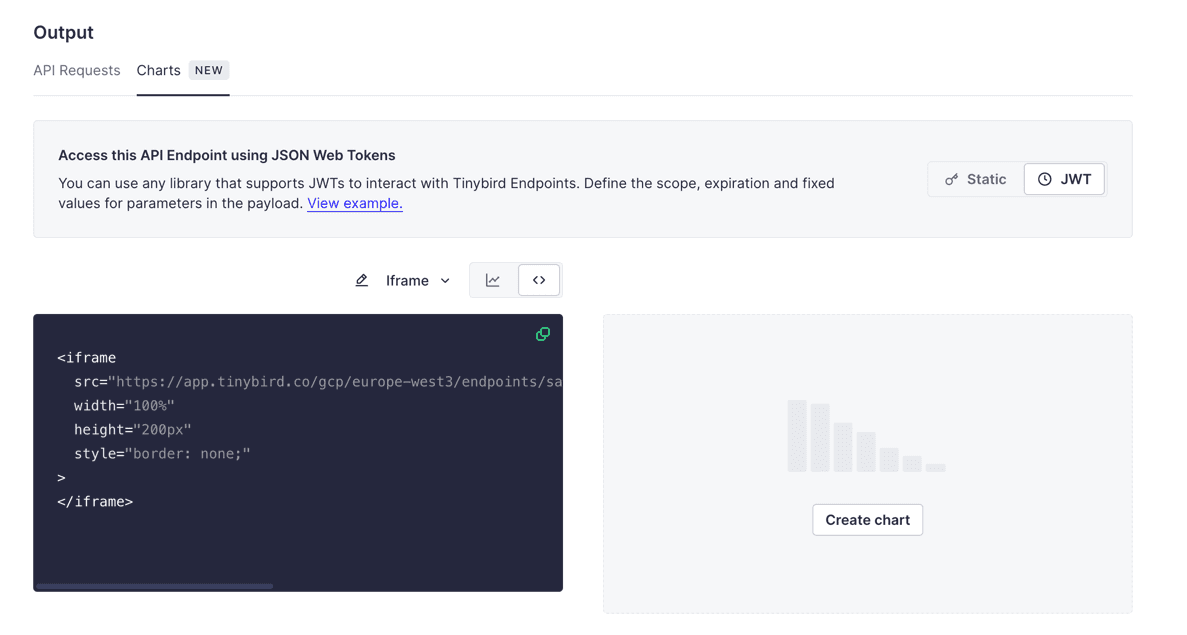
After saving your Chart, you're on the API Endpoint "Overview" page. Your Chart should be visible in the "Output" section.
To the view the component code for the Chart, select the code symbol (<>) above it. Select the dropdown and select the iframe example, instead of the default React one.
Now select the JWT so the Static Token shown in the iframe's URL is replaced by a <JWT_TOKEN> placeholder.

3. Insert your iframe into a new page
Now you have your Chart code, create a new index.html file to paste the code into:
index.html
<!DOCTYPE html>
<html lang="en">
<head>
    <meta charset="UTF-8">
    <meta name="viewport" content="width=device-width, initial-scale=1.0">
    <title>Tinybird Charts</title>
</head>
<body>
    <!-- The iframe code coming from Tinybird: -->
    <iframe
    src="https://app.tinybird.co/gcp/europe-west3/endpoints/sales_by_city/charts/4d21283f-b85c-4ed5-8341-e2625f0e3080?token=<JWT_TOKEN>"
    width="100%"
    height="200px"
    style="border: none;">
    </iframe>

</body>
</html>
In the next step, you'll generate a JWT to replace the <JWT_TOKEN> placeholder.
4. Create a JWT
Understanding the token exchange

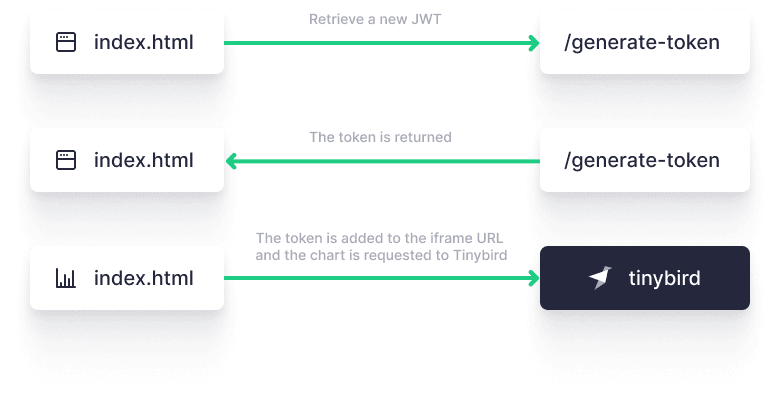
For each user session (or any other approach you want to follow), your frontend application will send a request with a JWT to your backend. It can be a new or an existing one. Your backend will self-sign and return the token. From that point onwards, you can use this token for any Chart or API call made to Tinybird, directly from your frontend application.
JWTs support TTL and includes multi-tenancy capabilities, which makes them safe to use without creating any complex middleware.
Create a JWT endpoint
Create a new endpoint that your frontend will use to retrieve your token. Remember to set your TINYBIRD_SIGNING_KEY:
Generate a new token
from flask import Flask, jsonify, render_template
import jwt
import datetime
import os

app = Flask(__name__)

# Get your Tinybird admin Token
TINYBIRD_SIGNING_KEY=<admin-key> # Use your admin Token as the signing key, or use process.env.TB_TOKEN / similar if you have it set locally

# Generate Token function for a specific pipe_id
def generate_jwt():
    expiration_time = datetime.datetime.utcnow() + datetime.timedelta(hours=48)
    workspace_id = "1f484a32-6966-4f63-9312-aadad64d3e12"
    token_name = "charts_token"
    pipe_id = "t_b9427fe2bcd543d1a8923d18c094e8c1"

    payload = {
        "workspace_id": workspace_id,
        "name": token_name,
        "exp": expiration_time,
        "scopes": [
            {
                "type": "PIPES:READ",
                "resource": pipe_id
            },
        ],
    }

    return jwt.encode(payload, TINYBIRD_SIGNING_KEY, algorithm='HS256')

@app.route('/generate-token', methods=['GET'])
def get_token():
    token = generate_jwt()
    return jsonify({"token": token})

if __name__ == '__main__':
    app.run(host='0.0.0.0', port=5151)
5. Use the JWT in your iframe
Edit your index.html file using JavaScript to retrieve a JWT from your API Endpoint, and include this token in your iframe.
Update the index.html file
<!DOCTYPE html>
<html lang="en">
<head>
    <meta charset="UTF-8">
    <meta name="viewport" content="width=device-width, initial-scale=1.0">
    <title>Tinybird Charts</title>
</head>
<body>
    <!-- This is the iframe code from Tinybird. The URL has been stripped from the src attribute. The URL will be included using JavaScript, adding self-signed JWT.-->
    <iframe
        id="tinybird-chart"
        src=""
        width="100%"
        height="200px"
        style="border: none;"
    >
    </iframe>

    <script>
        document.addEventListener("DOMContentLoaded", function() {
            // Configuration
            const tokenEndpoint = 'http://localhost:5151/generate-token';
            const iframe = document.getElementById('tinybird-chart');
            const iframeBaseUrl = 'https://app.tinybird.co/gcp/europe-west3/endpoints/sales_by_city/charts/78f0fec8-4a5e-4072-a4f7-b3e37e123839?token=';

            // Function to get the token
            function fetchToken() {
                fetch(tokenEndpoint)
                    .then(response => {
                        if (!response.ok) {
                            throw new Error('Network response was not ok ' + response.statusText);
                        }
                        return response.json();
                    })
                    .then(data => {
                        const token = data.token;
                       // Update the iframe with the URL plus the retrieved token
                        iframe.src = iframeBaseUrl + token;
                    })
                    .catch(error => {
                        console.error('There has been a problem with your fetch operation:', error);
                    });
            }

            // Get the token
            fetchToken();
        });
    </script>
</body>
</html>
Next steps
- Learn more about JSON Web Tokens (JWTs)
- Learn more about Tinybird Charts
- Consume APIs in a Next.js frontend using JWTs
- Add Tinybird Charts to a Next.js frontend