Tinybird Forward is live! See the Tinybird Forward docs to learn more. To migrate, see Migrate from Classic.
Working with version control
With Tinybird, you can take your existing version control knowledge from software engineering, and apply it immediately to your real-time data products, using Git.
How the Git integration works
Tinybird's Git integration creates a bi-directional link between your Tinybird Workspace and a remote Git repository. This means you can work on Tinybird resources locally, push to Git and then sync to Tinybird. In this way, Git becomes the ultimate source of truth for your project.
You can then follow standard development patterns, such as working in feature branches, using pull requests, and running CI/CD pipelines to validate changes and deploy to production.
When you connect your Workspace to a Git repository, use the following CI/CD to deploy to the Workspace. The CI/CD pipelines need to be executed outside of Tinybird in a runner such as GitHub Action or GitLab Runner.
You can connect your Workspace to Git using the CLI.
You can connect both new and existing Tinybird Workspaces with Git at any time. If you're connecting an existing Workspace for the first time, your project syncs with the remote Git-based repository the moment you connect it. If you make changes in Tinybird after connecting with Git, you can create a Branch and merge the changes with a Pull Request.
Project structure
A Tinybird project is represented by a collection of text files (called datafiles) that are organized in folders.
You can initialize a new Tinybird project with automatic scaffolding using the tb init CLI command. This creates the following files and folders:
- /datasources
- /datasources/fixtures
- /endpoints
- /pipes
- /tests
- /scripts
- /scripts/exec_test.sh
- /scripts/append_fixtures.sh
- /deploy
If you have an existing project created in the UI, use the tb pull --force command to download all resources from your Workspace, creating the same structure as above.
The purpose of these files and folder is as follows:
datasources: Where you put your .datasource files.datasources/fixtures: Place as many CSV or NDJSON files that will be pushed when using the default./scripts/append_fixtures.shscript. They need to share name with a .datasource file.endpoints: You can use this folder to create a logical separation between non-Endpoint Pipes and Endpoint Pipes, though it's not necessary. By default, all .pipe files will be placed in thepipes/directory when pulled from Tinybird.pipes: Where you put your .pipe files.tests: Where you put data quality and fixture tests.scripts: Useful scripts for common operations like data migrations, fixtures tests, etc.deploy: Custom deployment shell scripts.
Connect your Workspace to Git from the CLI
To connect your Workspace to Git, you will need a Tinybird Workspace and a Git repository. You can either connect a pre-existing repository, or create a new one as part of this process.
If you don't already have the CLI installed, follow the instructions here.
To initialize your Workspace with Git, run the tb init --git command. It performs the following actions:
- Checks there are no differences between your local files and Tinybird Workspace.
- Saves a reference to the current Git repository commit in the Workspace. This commit reference is used later on to diff Workspace resources and resources in a branch, to ease deployment.
Initialize Tinybird with a Git repository
tb init --git

    ** - /datasources already exists, skipping
    ** - /datasources/fixtures already exists, skipping
    ** - /endpoints already exists, skipping
    ** - /pipes already exists, skipping
    ** - /tests already exists, skipping
    ** - /scripts already exists, skipping
    ** - /deploy already exists, skipping
    ** - '.tinyenv' already exists, skipping

    ** Checking diffs between remote Workspace and local. Hint: use 'tb diff' to check if your data project and Workspace synced
    Pulling datasources  [####################################]  100%
    Pulling pipes  [####################################]  100%
    Pulling tokens  [####################################]  100%
    ** No diffs detected for 'workspace'
Once complete, create CI/CD actions to integrate Tinybird with your Git provider. These actions should be based on your development pipeline, and the CLI commands Tinybird provides offer an excellent basis upon which to validate changes and deploy to Tinybird safely from Git.
Add the .tinyb file to your .gitignore to avoid pushing the Tinybird configuration files to your Git provider.
Pushing the CI/CD actions to your Git provider
    echo ".tinyb" >> .gitignore
    git add .
    git commit -m "Add Tinybird CI/CD actions"
    git push
You must save your Workspace admin Token as a secret in your repository. For example, with GitHub, go to your repository settings, and under Secrets and Variables / Actions, add the Token value in a secret called TB_ADMIN_TOKEN.
You can make your shell PROMPT print your current Workspace by following this CLI guide
Protecting the main Workspace
Once you decide to use this version-controlled workflow, the Git repository becomes your single source of truth. You'll want to keep production protected so users can't modify resources and break the Git workflow.
If you want to prevent users from making changes to a the Workspace from the CLI or API, open the Tinybird UI and navigate to the Workspace settings menu, then the Members tab, and assign the Viewer role. Users with a Viewer role aren't able to create, edit, or delete resources or run data operations. They are allowed to create a new Branch and change resources there.
Development workflow
This section explains how to safely develop new features using Branches.
Develop using the CLI
When prototyping a new API Endpoint or changing its logic, the UI is the easiest and fastest way to iterate and validate your changes, as you can see the results of your changes in real time. You can use a branch and then tb pull your changes to push them to Git.
But, when making changes like data migrations or column types, you need to use the CLI and modify the datafiles. Make sure you're familiar with the Tinybird CLI docs.
For changes like these, use the Git workflow: Create a new branch, make the changes in the datafiles, and create a Pull Request to validate the changes. For further guidance, read the CI/CD docs.
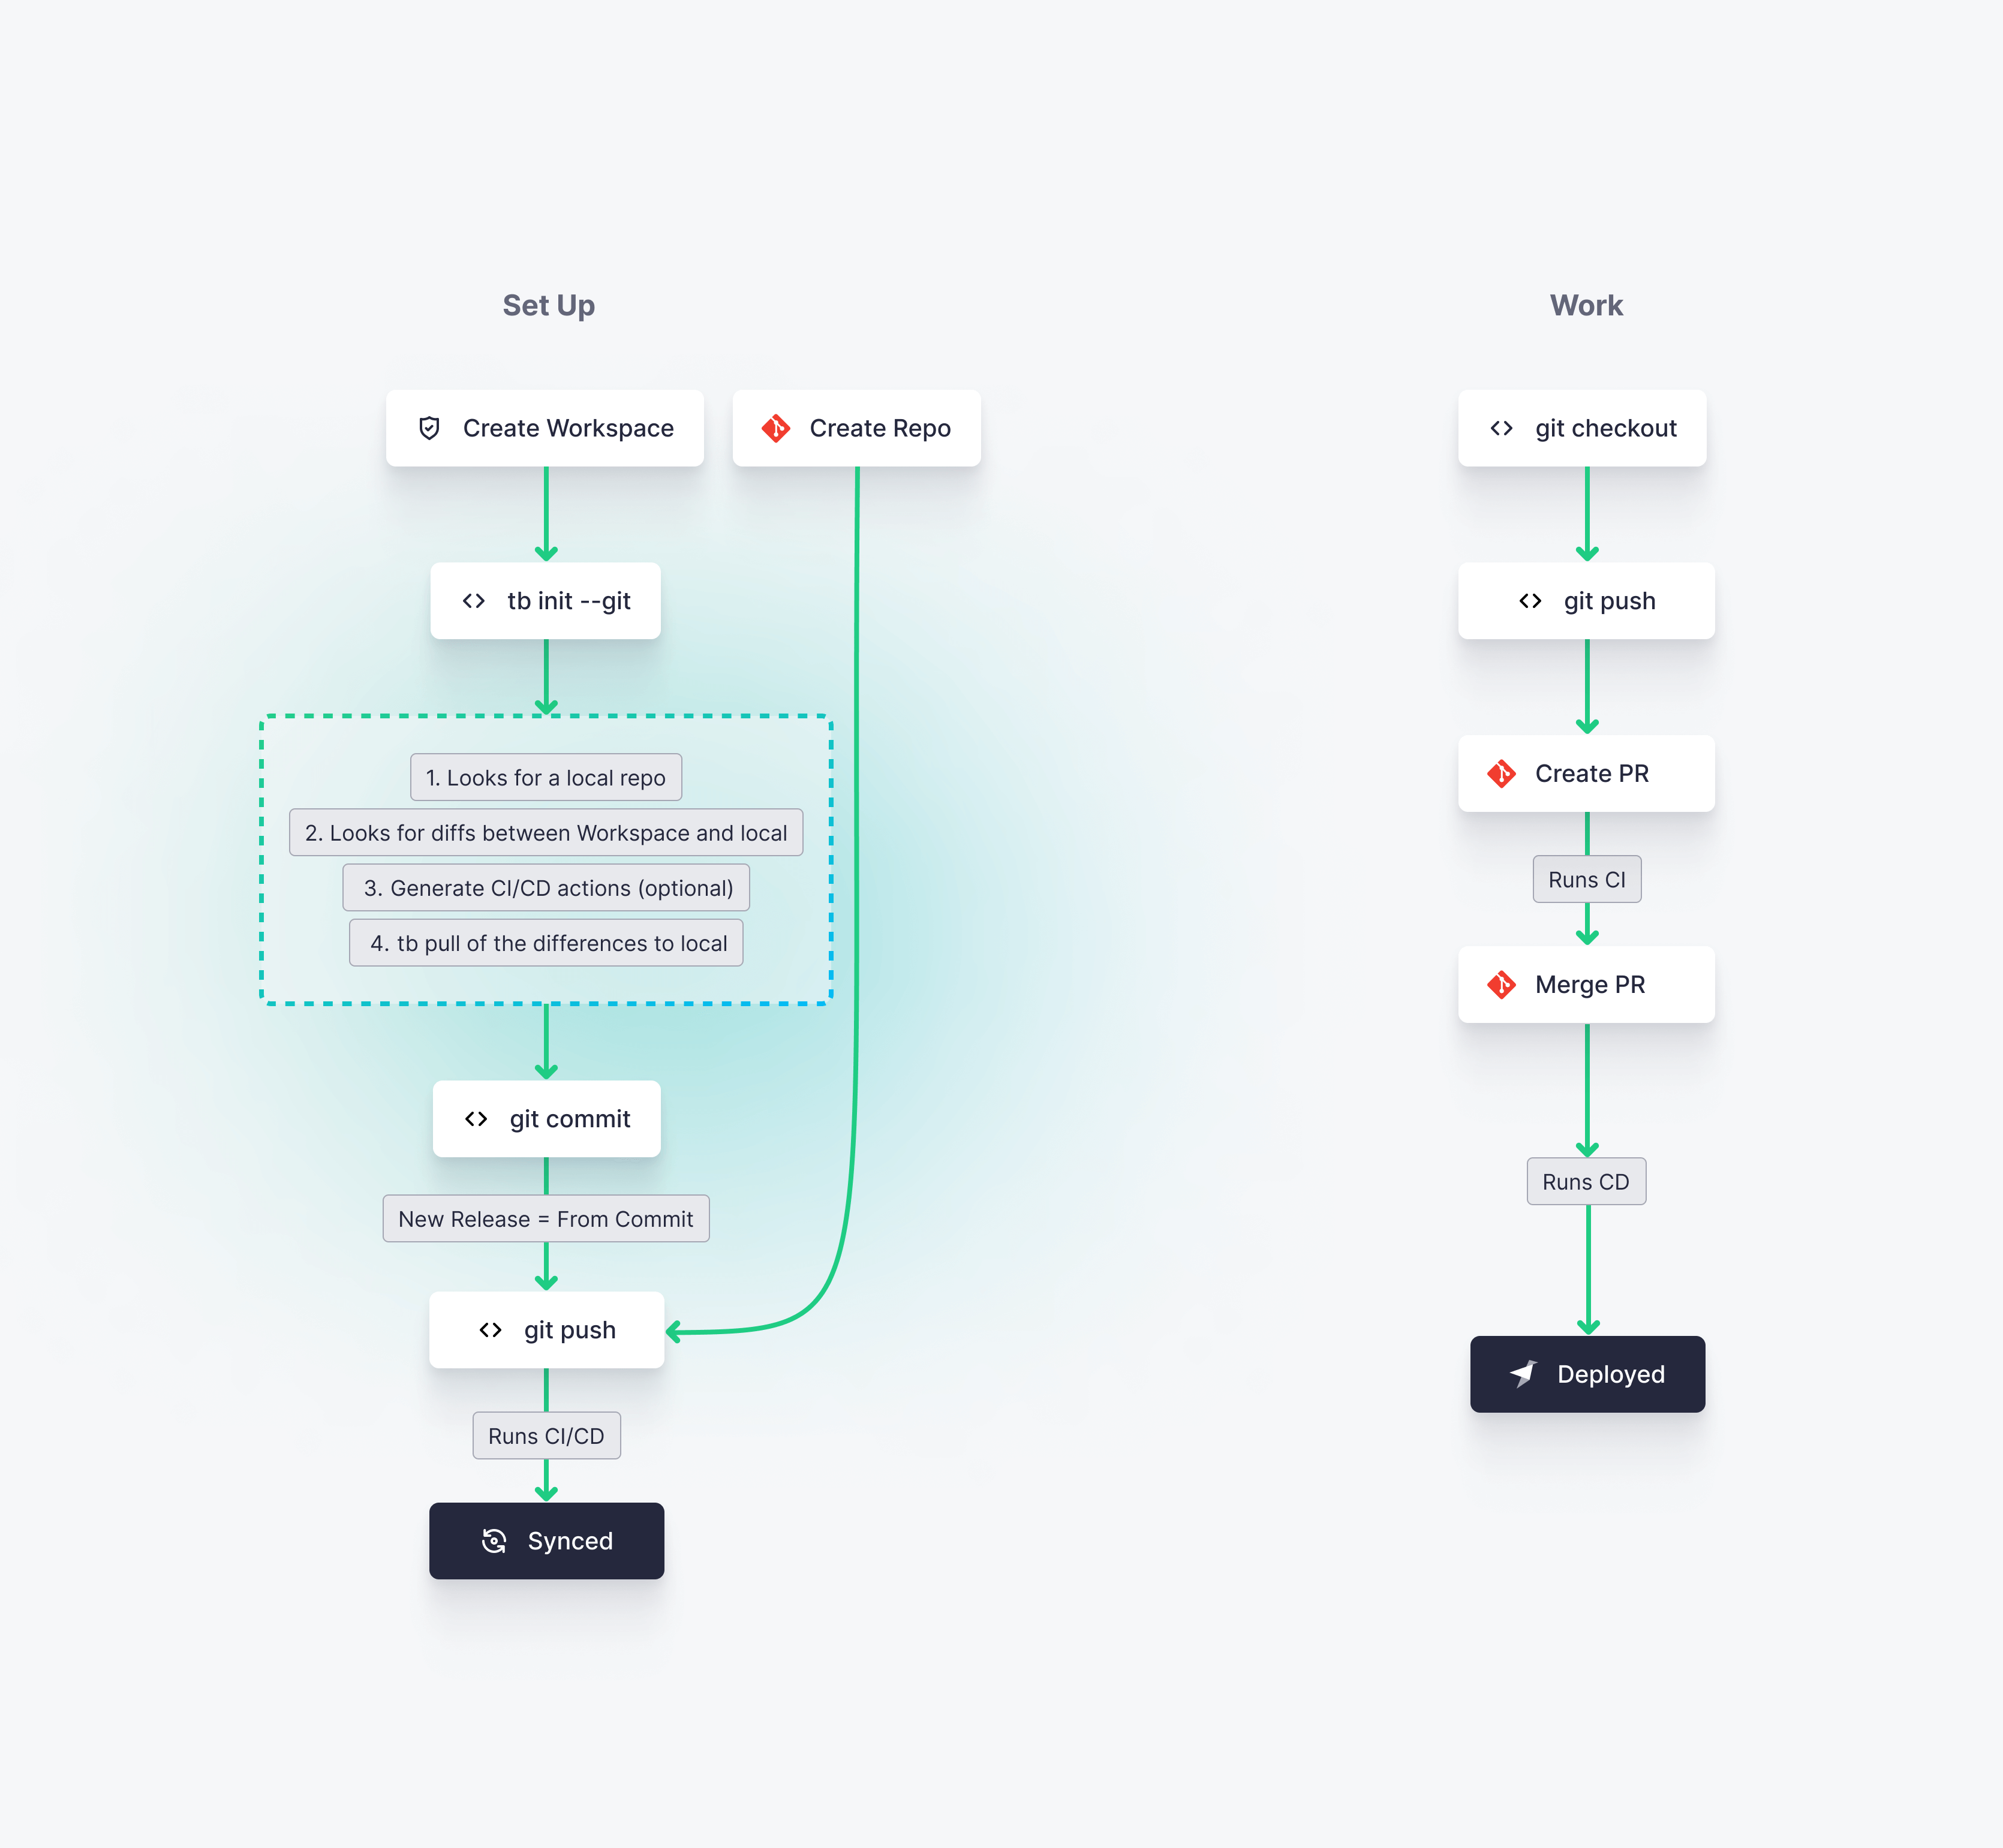
This image visualizes each process step when setting up and working with Git via the Tinybird CLI:
Exploration workflow
The Playground
Once you have protected production from user modifications, you might not be able to create Pipes directly.
To explore the data, you need to either create a new Branch, or use the Playground.
Once you've prototyped your new Pipe, download the Pipe from the UI and commit the change to a new Git branch to follow the CI workflow.
By default, Playground content is private to your Workspace view. However, you have the option to share your Playground with other Workspace members.
Troubleshooting
This section covers some of the problems you might face when working with version control.
Connect to more than one Workspace
You can have one Git repo connected to 2 Tinybird Workspaces - a common scenario is using this for staging and production Workspaces. Just use a different ADMIN_TOKEN in the GitHub Actions.
Initialization
When your Git repository and Tinybird Workspace have the same resources, tb init --git allows you to easily start up a CI/CD pipeline. However, when these aren't in sync, you might experience one of these three scenarios:
Problem: There are resources in the Workspace that aren't present in your Git repository.
Remove them from your Workspace (they are probably unnecessary) or run tb pull --match "<resource_name>" to download the resource(s) locally and push them to the Git repository before continuing.
Problem: There are resources in your Git repository that aren't present in your Workspace.
Either remove them from the project or run tb push them to the Workspace and re-run the init command.
Problem: There are differences between the resources in the Git repository and the ones in your Workspace.
In this instance, you must decide which version is the source of truth. If it's the resources in the Workspace, run tb pull --force to overwrite your local files. If it's your local files, run tb push --force file by file so the Workspace is synchronized with your project in Git.
Use tb diff to check if your project is synced. It diffs local datafiles to the corresponding resources in the Workspace.
Git and Workspace no longer synced
When you deploy, the Git commit ID of that deployment is stored in the Workspace. This means you can use the git diff command to compare your Branch against the main one, and know which resources have been modified and need to be deployed.
If you introduce a manual change in your Workspace or Git outside of the CI/CD workflow, they will no longer be synced. To get both components to once again be in sync with each other, use the command tb init --override-commit <GIT_COMMIT_ID>. This command will override the Git commit ID from the Workspace.
Common use cases
Version control allows you to incrementally change or iterate your data project. It's ideal for managing changes like adding a column, changing data types, redefining whole views, and lots more.
If you're new to using version control or want to be sure how to do it on Tinybird, there's an entire repository of use cases available: tinybirdco/use-case-examples.
Next steps
- Read about datafiles, the text files that describe your Tinybird resources (Data Sources, Pipes).
- Understand CI/CD processes on Tinybird.